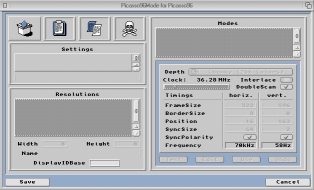
| Double-click on the System hard disk partition icon and then double-click the Prefs drawer icon. Double-click on the Picasso96Mode program to start the application and you will be presented with the main window as shown below: |
 |
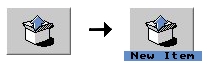
| Move your mouse pointer over the New Item button and hold down left mouse button. When you move the mouse pointer, whilst at the same time holding down the left mouse button, you can drag a New Item box as shown below: |
 |
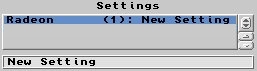
| Drag the New Item box over to the listview box directly entitled Settings and drop it on this listview (release left mouse button). The following will be displayed in the Settings listview box as shown: |
 |
| Hold down right mouse button and goto the Attach Setting to menu. From this menu, select the option Board 0: Radeon and the Settings listview will change as shown below: |
 |
| Move your mouse pointer over the New Item button and hold down left mouse button. When you move the mouse pointer, whilst at the same time holding down the left mouse button, you can drag a New Item box as shown below: |
|
| Drag the New Item box over to the listview box directly entitled Resolutions and drop it on this listview (release left mouse button). The following will be displayed in the Resolutions listview box as shown: |
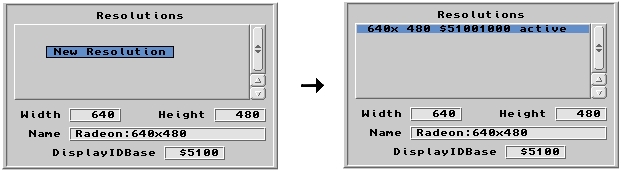 |
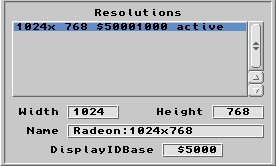
| Alter the Width value and the Height value to the corresponding width and height of the screenmode you wish to create. Then also alter the Name box to reflect the amendments you have made. For ecample, if you wished to make a screenmode of 1024 pixels by 768 pixels you would enter the following as shown: |
 |
| Move your mouse pointer over the New Item button and hold down left mouse button. When you move the mouse pointer, whilst at the same time holding down the left mouse button, you can drag a New Item box as shown below: |
|
| Drag the New Item box over to the listview box directly entitled Modes and drop it on this listview (release left mouse button). The following will be displayed in the Modes listview box as shown: |
 |
| Repeat the step above. Drag the New Item box over to the listview box directly entitled Modes and drop it on this listview (release left mouse button). Click the Depth cycle button until it reads HiColor. Then press the Use button. The following will be displayed in the Modes listview box as shown: |
 |
| Repeat the step above. Drag the New Item box over to the listview box directly entitled Modes and drop it on this listview (release left mouse button). Click the Depth cycle button until it reads TrueColor & Alpha. Then press the Use button. The following will be displayed in the Modes listview box as shown: |
 |
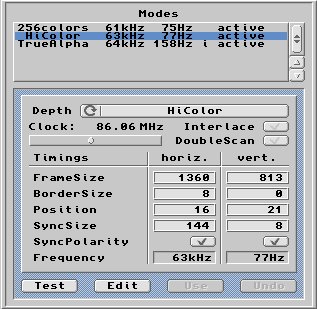
For each Mode, alter the Clock frequency and other options so that the horizontal and vertical Frequency boxes match the values as shown in your monitor's documentation. Please note that every monitor has varying horizontal and vertical frequencies for every resolution that it can display. The manufacturer of your monitor will publish the horizontal and vertical frequencies of each screenmode in the documentation that was supplied with the monitor. When you want to test the values you enter, you can use the  button which will display the screenmode. If no picture is displayed or the display is garbled then the frequencies are incorrect for your make of monitor (re-check the monitor's technical documentation). The example settings shown below may vary for your particular make/model of monitor: button which will display the screenmode. If no picture is displayed or the display is garbled then the frequencies are incorrect for your make of monitor (re-check the monitor's technical documentation). The example settings shown below may vary for your particular make/model of monitor: |
 |
When you have completed setting up your screenmodes, press the  button which will Save your settings to the file named Picasso96Settings in the DEVS drawer of your System partition. The Amiga will need to be rebooted and on restart, the new screenmodes will be available in the Screenmode Preferences. button which will Save your settings to the file named Picasso96Settings in the DEVS drawer of your System partition. The Amiga will need to be rebooted and on restart, the new screenmodes will be available in the Screenmode Preferences. |

